How to make a DIY room divider out of bifold closet doors
On a recent trip to my local Habitat for Humanity Restore in Clearwater, Florida, I couldn’t help but notice how many sets of bifold closet doors they had in stock. Rows upon rows of creative opportunity were lined up at the back of the store! I’m lucky my small car could only fit one set to bring home.
Bifold closet doors are a great item to repurpose. Try searching bifold door projects on Pinterest and you’ll see oodles of DIY projects in home décor, storage and more. One of my favorite projects is repurposing bifold closet doors into a DIY room divider.
It’s an easy DIY project that turns out great, looks far better than a manufactured room divider and is easy on the budget. I’m sharing how I make a room divider along with painting tips to make this an easy afternoon project.
Below is what a set of bifold closet doors look like. They can vary in size. Be sure to measure the space where you’ll put your room divider and keep the measurement in mind as you select your bifold doors.
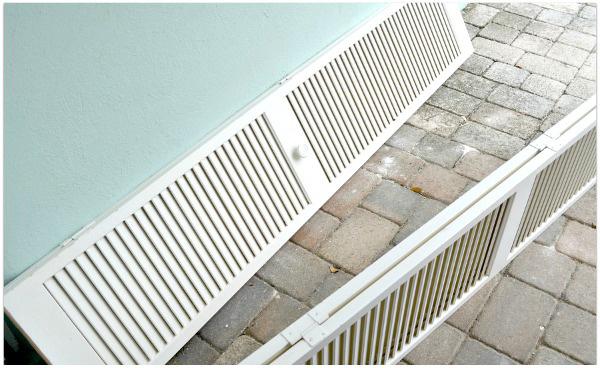
Start by removing all of the existing hardware from a set of bifold doors. This will leave you with four panels. Pick the three best ones for your room divider. Put the hinges aside for later. Keep the last panel and the knobs for another project.
Prepare the surface by wiping it down thoroughly with a degreaser and de-glosser. I like Trisodium Phosphate, or TSP, because it’s inexpensive, works great and is easy to find in any paint department. Be sure to clean the slats as well.
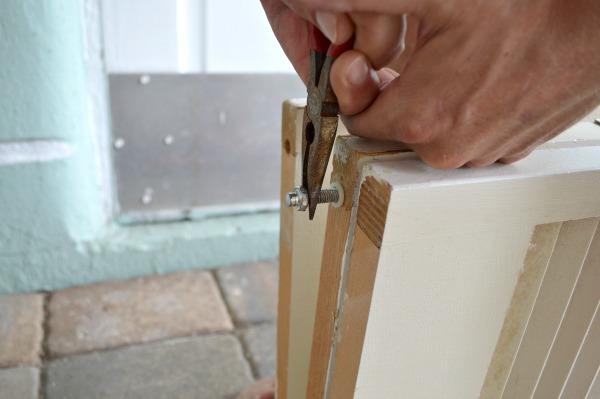
Next, you’ll reinstall the hinges on two of the three panels. This reconnects them as they originally were. Take the third panel and connect the hinges so they fold the opposite way, like a “Z”, which is how room dividers fold. Your room divider project is now ready to paint.
Painting these doors can be a chore. You could spray paint or use a paint sprayer to get a smooth coat of paint on your project. I like to dry brush my paint onto the panels and slats of this type of project. This adds a little texture, covers up imperfections and it’s fast. Dry brushing is simply applying paint onto a surface with an almost dry brush.
Dip the tip of a paint brush into paint, dab the extra paint off on a paper towel and run the paintbrush back and forth across the surface. Pounce the brush into the slats to get the paint into the hard to reach spots.
Dry brushing gives a layered look. The surface will not have an even coat of paint. Layering colors of paint adds detail and creates lovely depth and variation. I layered light blue, some white and a touch of green and even a little dark grey in a few places.
Allow your paint to dry thoroughly. Then, have fun placing it on the perfect spot in your home!
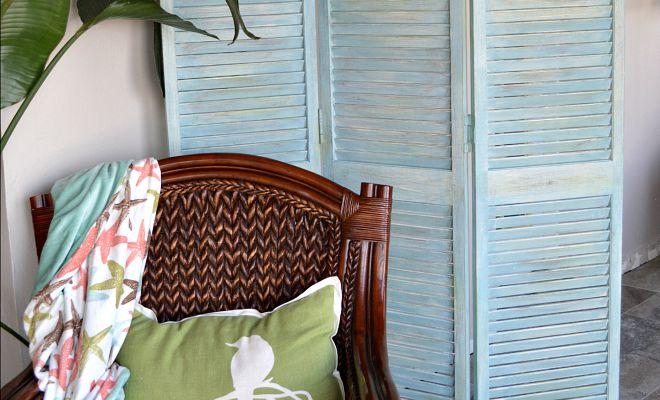
Room dividers are useful for adding height, covering a storage area, breaking up a long room and even adding privacy. Repurposing bifold closet doors into stylish room dividers is a smart way to achieve a custom look on a budget and help others at the same time.
Let us know in the comments below where you would use a room divider in your home.
Power suits were traded for colorful flip-flops when a relocation to Florida set the stage for an opportunity to dramatically downsize and simplify the family lifestyle. Choosing to follow in the family footsteps of creativity and art, Wendi uses her barrier island 1950s waterside bungalow, as the stage for her creative outlet and blog, H2OBungalow. Using everything from paint to power tools, Wendi tackles one DIY project at a time to create a fabulous coastal home with charm.